How to Use HoGo
This section provides a quick tour of HoGo, showing you how to use the some of the powerful features to protect and send PDF, Word, Excel, and PowerPoint documents. Files must be PDF’s under 50MB, and may not contain layers or passwords. For Word, Excel, and PowerPoint files, they must be created using Microsoft Office 2010 or newer and must not be password protected.
Sending documents with HoGo
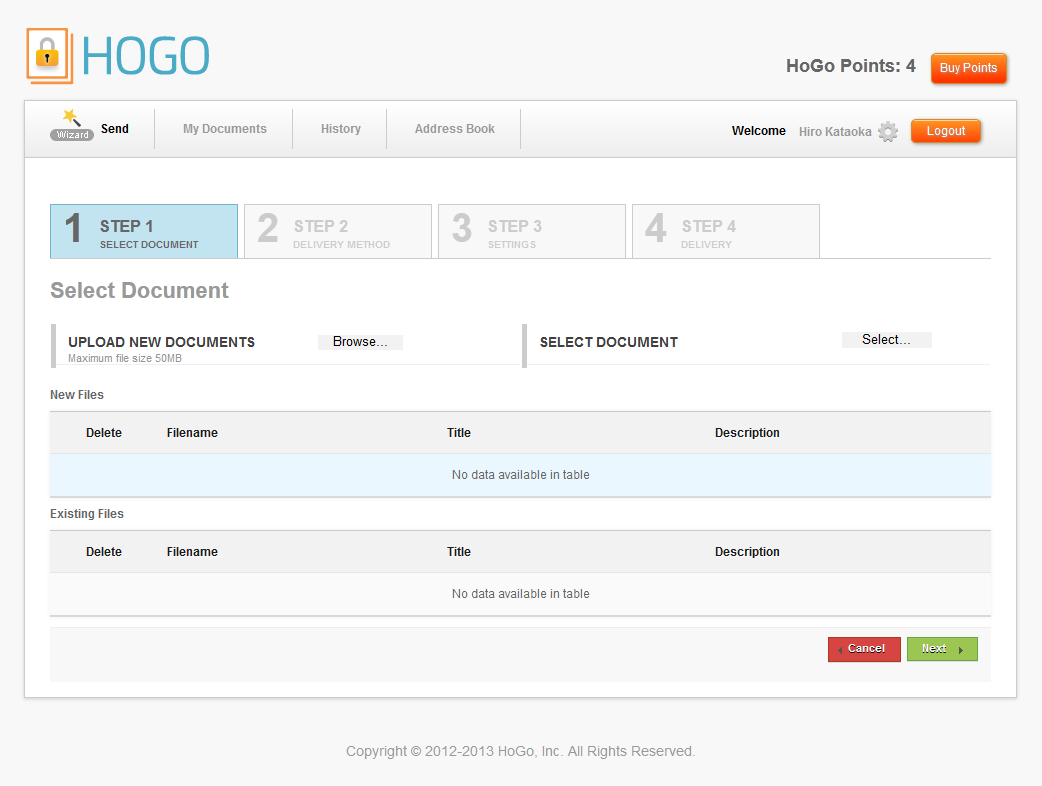
Step 1 - Select your documents
After creating an account and logging in, you will see the Send Wizard screen. Here, you can select files on your computer or cloud services such as Google Drive, Dropbox, and Box to upload to HoGo, or select from files which you have already encoded using HoGo.
Step 2 - Set who can view your documents
Next, you can specify who can view your documents by entering their E-mail address or selecting recipients from the Address Book. Anyone you send a document to is automatically added to your Address Book. You can also import contacts from Gmail or a CSV file.
You can also choose to not specify your recipients up front. This is convenient when you are dsitrbuting documents or e-books to a wider audience. In this case, whoever downloads the documents will be required to enter a valid e-mail address before downloading the document. The documents will then by locked to that E-mail address so that it cannot be re-shared without your permission.

Step 3 - Set document settings
Further down the Send Wizard screen, you can set document permissions such as expiry date, whether documents can be printed, and in the case of Microsoft Office documents, whether they can be edited and saved.
Step 4 - Link settings
HoGo creates web links from where your recipients can download your protected documents. You can also set an expiry date for the link, which may be different from the expiry date of the document. You can also set a password to access the link itself for additional protection.
IMPORTANT: Make sure that you set the maximum number of downloads to match your transmission. If you are sending 1 file to 5 people, you should set this number to at least 5 to allow everyone to download the file.
Step 5 - (Optional) Advanced options
If you are sending just PDF files, the Advanced Options button allows you to set some additional settings. If you select "View in Browser Only", the documents will not be downloadable. View in HoGo Viewer Only, forces the recipient to view PDF documents in the free HoGo Viewer app, and will not allow the use of Adobe Reader or Acrobat DC. Finally, selecting "Send Directly to HoGo Viewer" will cause the documents to be sent directly to the recipients HoGo Viewer account. There is no web link created. When the recipient opens their HoGo Viewer app and syncs the app with their account, the documents will automatically appear.
Step 6 - Send E-mail Notification / Copy Link
Once you are satisfied with your settings, click on NEXT and HoGo will begin encoding your files. Once the encryption is completed you will see the screen below. Here you can copy the download link for your protected documents and send notification e-mails to your recipients that contain the link. To send notification e-mails. be sure to click on FINISH at the bottom.

The Download Page
If you open the link in the previous screen, you will see something like this. This is also what your recipients will see when they click on the link in the notification E-mails. From here, you can download the protected file to your PC, Mac, or open PDF documents on mobile devices such as Android or iOS.

Managing Documents Using HoGo
HoGo stores documents you have sent, making it easy to send them again, or to manage past transmissions. All data on HoGo is encrypted, for security and privacy. The screen below shows a list of documents in a HoGo account.

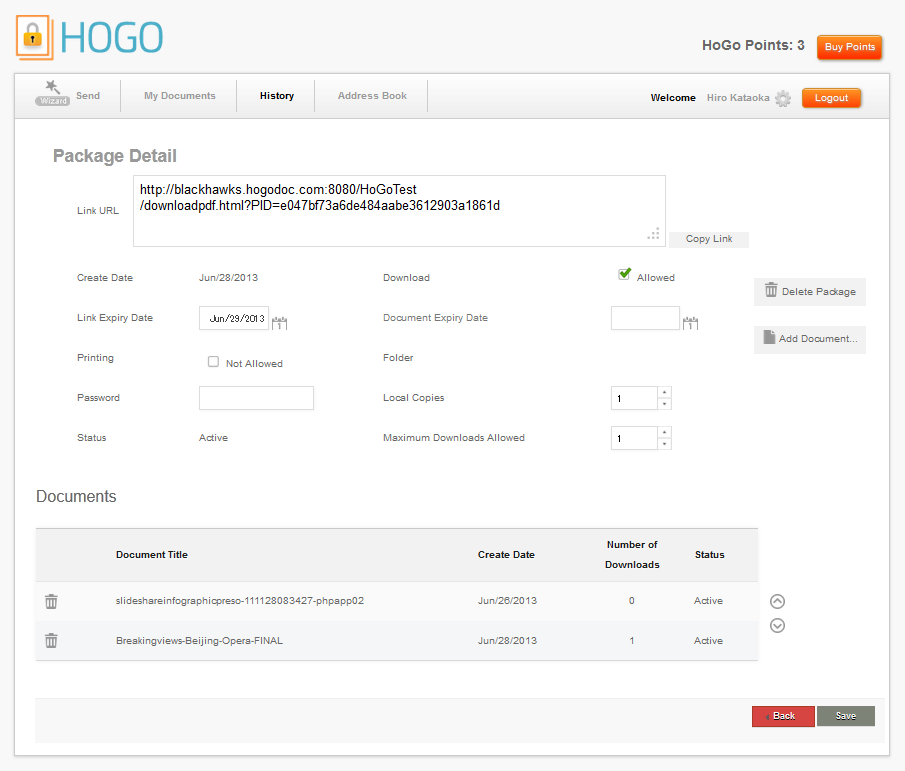
Double clicking on a document will let you access the detailed information of each document, and of each package that contains the document. A package is a set of recipient(s) and document(s) that have been sent. From the screen below, you can add document or recipients to a package, as well as take documents away. These powerful features give you complete control over who sees your documents, and when.
Managing Recipients on HoGo
Just like documents, HoGo lets you store your recipients in an Address Book so that sending more documents to the same recipients is a snap. You can also transfer data from popular e-mail applications by uploading a .csv file or importing your Gmail address book directly.
Viewing HoGo Documents
| Filetype | Platform | Sending Method | How to View |
| PC, Mac | Download from link or Box | Download and save the file, then open with Adobe Reader XI or newer, or Acrobat DC. Follow instructions on screen to enter e-mail address and PIN. | |
| Android, iOS | Any | Install HoGo Viewer from the AppStore or Google Play. Tap on Cloud Library icon after registering the Viewer and download your documents. | |
| Any | Direct send to HoGo Viewer | If you received an e-mail notification that says a document has been sent, and to open it with HoGo Viewer, download and intall HoGo Viewer for your platform, register it to the E-mail address that you received the notification, and click on the Cloud Library icon to download your documents. | |
| Word, Excel, PowerPoint | PC | Download from link or Box | Download and save your file, then open with Microsoft Office 2010, 2013, or 2016 for Windows. Click "Enable Editing". Download and install the "bookend Add-in" and restart Office. Open your file. |